(Vorerstmal nur die DX7 version)
womöglich lange vermisst und nun endlich da: die Möglichkeit Bmax2d-images zu verzerren und einzufärben mit alpha-channel!
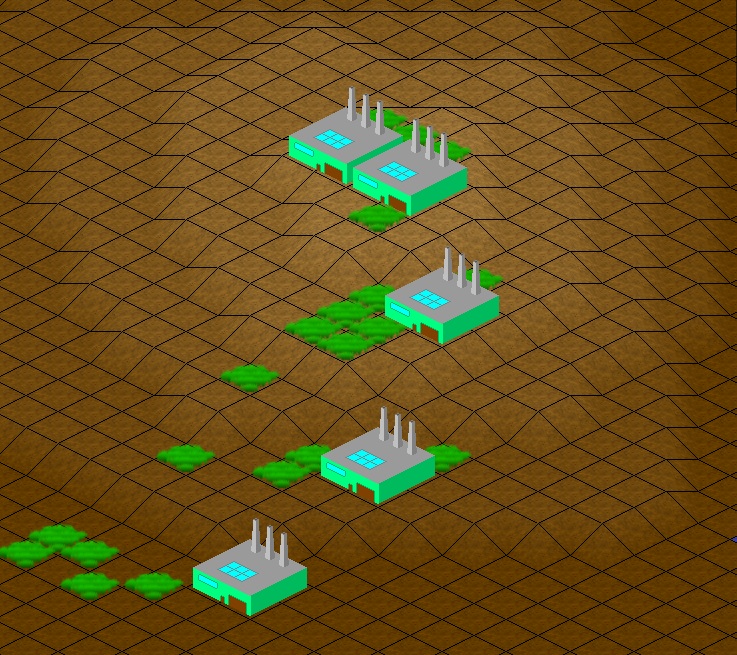
Ich habe mehrere Stunden damit verbracht diese Funktion zu basteln ( <3 Google ) nun möchte ich diese euch nicht vorenthalten. Vorher hatte ich den Standard d3d7max2d.mod verändert was mir Bmax beim neu bauen von den Modulen übel nahm. Aber mit der totalen Kontrolle über Timages kann wesentlich mehr machen als ich zuerst dachte und eigentlich machen wollte. Mit dieser Funktion lassen sich leichter iso-maps bauen  . So und los geht’s: . So und los geht’s:
Einfach eine include mit:
BlitzMax: [AUSKLAPPEN] [EINKLAPPEN]
Global boostMax2D_Driver:TD3D7Max2DDriver, boostMax2D_active:Int
Function init_boostMax2D(device:TD3D7Max2DDriver)
boostMax2D_Driver = device
boostMax2D_active = True
End Function
Function DrawPolyImage(image:TImage, xy:Float[], tx:Float = 0, ty:Float = 0, frame:Int = 0, color:Int[] = Null, own_xyzuv:Float[] = Null)
Function Pow2Size:Int(n:Int)
Local t:Int = 1
While t < n
t:*2
Wend
Return t
End Function
If Not boostMax2D_Driver.IsValid() Return
If Not boostMax2D_active Then RuntimeError("boostMax2D: run first 'init_boostMax2D(D3D7Max2DDriver())'")
Local iframe:TImageFrame = image.Frame(frame)
Local d3d7frame:TD3D7ImageFrame = TD3D7ImageFrame(image.frames[frame])
Local swidth:Float = Pow2Size(image.width)
Local sheight:Float = Pow2Size(image.height)
Local uv:Float Ptr
Local c:Int Ptr
Local xyzuv:Float[] = New Float[24]
If own_xyzuv Then
xyzuv[4] = own_xyzuv[0]
xyzuv[5] = own_xyzuv[1]
xyzuv[10] = own_xyzuv[2]
xyzuv[11] = own_xyzuv[3]
xyzuv[16] = own_xyzuv[4]
xyzuv[17] = own_xyzuv[5]
xyzuv[22] = own_xyzuv[6]
xyzuv[23] = own_xyzuv[7]
Else
xyzuv[4] = 0.0
xyzuv[5] = 0.0
xyzuv[10] = Float(image.width) / swidth
xyzuv[11] = 0.0
xyzuv[16] = Float(image.width) / swidth
xyzuv[17] = Float(image.height) / sheight
xyzuv[22] = 0.0
xyzuv[23] = Float(image.height) / sheight
End If
uv = xyzuv
c = Int Ptr(uv)
uv[0] = xy[0] * boostMax2D_Driver.ix + xy[1] * boostMax2D_Driver.iy + tx
uv[1] = xy[0] * boostMax2D_Driver.jx + xy[1] * boostMax2D_Driver.jy + ty
If color Then c[3] = color[0] Else c[3] = boostMax2D_Driver.drawcolor
uv[6] = xy[2] * boostMax2D_Driver.ix + xy[3] * boostMax2D_Driver.iy + tx
uv[7] = xy[2] * boostMax2D_Driver.jx + xy[3] * boostMax2D_Driver.jy + ty
If color Then c[9] = color[1] Else c[9] = boostMax2D_Driver.drawcolor
uv[12] = xy[4] * boostMax2D_Driver.ix + xy[5] * boostMax2D_Driver.iy + tx
uv[13] = xy[4] * boostMax2D_Driver.jx + xy[5] * boostMax2D_Driver.jy + ty
If color Then c[15] = color[2] Else c[15] = boostMax2D_Driver.drawcolor
uv[18] = xy[6] * boostMax2D_Driver.ix + xy[7] * boostMax2D_Driver.iy + tx
uv[19] = xy[6] * boostMax2D_Driver.jx + xy[7] * boostMax2D_Driver.jy + ty
If color Then c[21] = color[3] Else c[21] = boostMax2D_Driver.drawcolor
boostMax2D_Driver.SetActiveFrame(d3d7frame)
boostMax2D_Driver.device.DrawPrimitive(D3DPT_TRIANGLEFAN, D3DFVF_XYZ | D3DFVF_DIFFUSE | D3DFVF_TEX1, uv, 4, 0)
End Function
und einmal „init_boostMax2D(D3D7Max2DDriver())“ aufrufen (nach dem man das Graphics Fenster erstellt hat) und die Funktion ist einsatzbereit.
Und so benutzt man es:
BlitzMax: [AUSKLAPPEN] [EINKLAPPEN]
Local tri:Float[]
Local colordata:Int[4]
tri = [p1x, p1y, p2x, p2y, p3x, p3y, p4x, p4y]
Local cdat1:Byte Ptr = Varptr(colordata[0])
cdat1[0] = blau
cdat1[1] = gruen
cdat1[2] = rot
cdat1[3] = alpha
Local cdat2:Byte Ptr = Varptr(colordata[1])
cdat2[0] = blau
cdat2[1] = gruen
cdat2[2] = rot
cdat2[3] = alpha
Local cdat3:Byte Ptr = Varptr(colordata[2])
cdat3[0] = blau
cdat3[1] = gruen
cdat3[2] = rot
cdat3[3] = alpha
Local cdat4:Byte Ptr = Varptr(colordata[3])
cdat4[0] = blau
cdat4[1] = gruen
cdat4[2] = rot
cdat4[3] = alpha
Local trionimage:Float[8]
trionimage[0] = 0.0
trionimage[1] = 0.0
trionimage[2] = 1.0
trionimage[3] = 0.0
trionimage[4] = 1.0
trionimage[5] = 1.0
trionimage[6] = 0.0
trionimage[7] = 1.0
DrawPolyImage(TImage, tri,,, , colordata, trionimage)
DrawPolyImage(TImage, tri,,, , colordata)
SetColor(255,255,255)
DrawPolyImage(TImage, tri)
was man damit nun tolles anstellen kann?
(edit1) own_xyzuv:Float[] < Bildausschnitt hinzgefügt
|